In order to inspect the side walls and the anterior and posterior wall of the vagina, and the vaginal portion of the cervix (the part of the cervix that is visible inside the vagina) and its surrounding structures, it is necessary to part the walls of the vagina. This is done with the aid of a speculum.
A speculum examination not only facilitates internal inspection, it also makes the vagina and vaginal portion of the cervix accessible for conducting diagnostic investigations, such as preparing a smear or carrying out a discharge investigation. These two investigations are covered in the sectiion “Specific investigations”.
Inserting the speculum
- Choose the correct type and size speculum and the appropriate lubricant.
Your choice is dependant on the situation: will you be examining a nulliparous, multiparous or postmenopausal woman; what type of diagnostic investigations will you be conducting and which materials are you accustomed to working with.
- Apply the lubricant to the speculum [Figure 27].
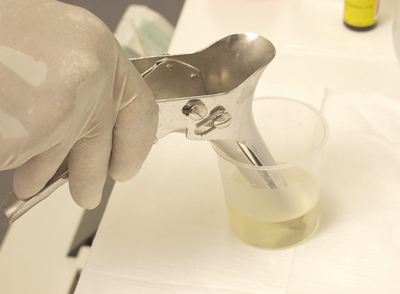 Figure 27
- Sit down on the stool and aim the light source at the area to be examined
[Figure 28].
 Figure 28
- Part the labia so that the vaginal introitus is clearly visible and keep them apart until the speculum has been inserted deep enough, to avoid hairs or skin being pulled into the vagina [Figure 29].
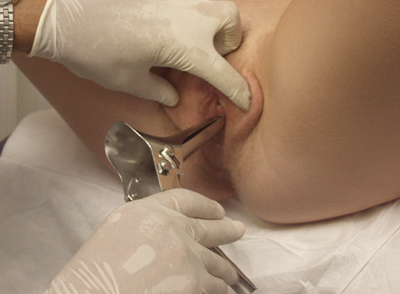 Figure 29
- Hold the closed speculum ‘loosely’ in the hand; hold your lower arm and wrist in a low position.
- Holding it at a 45-degree angle, push the closed speculum into the vaginal introitus. Insert the speculum along the direction of the vaginal axis. Be aware that the vaginal axis runs diagonally upwards in the dorsal direction, meaning that it runs in the direction of the flexed, or supported, thighs. To avoid pain evoked by pressure on the urethra, press on the posterior wall of the vagina.
- Slowly allow the speculum to slide up into approximately 1/3 of the vagina, then turn the speculum horizontally (keeping it closed). Continue to follow the vaginal axis [Figure 30].
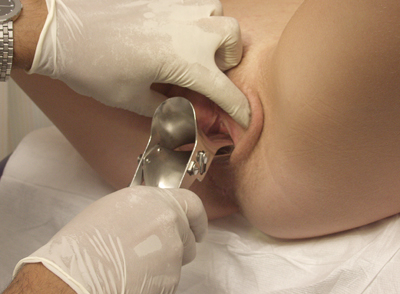 Figure 30
- Keep the speculum closed until the posterior fornix has been reached (you will feel resistance), open the speculum slowly [Figure 31] and try to visualize the vaginal portion of the cervix (ectocervix). Here the difference in colour and structure of the cervix in comparison to the vaginal wall is used for orientation purposes. Bear in mind that manipulation of the speculum is unpleasant for the woman; pressure against the anterior wall of the vagina is particularly painful. The cervix can be located by using gentle, small movements of the speculum. If required, the speculum can be withdrawn slightly before refocusing on the vaginal wall / cervix.
- When approaching the posterior fornix the speculum can be opened slowly and you can try to ‘catch’ the cervix between the blades. When opening the speculum, pay attention to where it is positioned and where the cervix is, so that you can make adjustments.
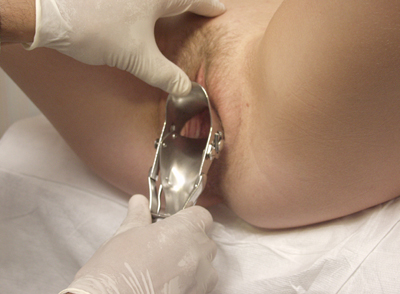 Figure 31
Inspection of the cervix
- If you have problems bringing the cervix into view:
- Ask the patient to relax and push her lower back against the examination table if you think that this is the cause of the problem.
- If you cannot find the cervix you can consider palpating its position first, allowing you to decide how to best direct the speculum in order to gain a view of the cervix.
- Once you have a good view of the cervix, slide the opened speculum a bit further into the fornices and fix it [Figure 32].
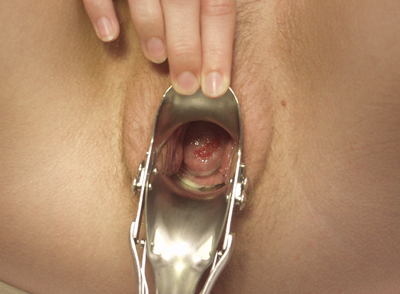 Figure 32
- Never leave the speculum unfixed in the vagina while you carry out tasks. There is a risk that it will tilt, leading to the front blade pushing against the vaginal anterior wall or the opened speculum sliding out of the vagina (painful!). Ask the patient to hold the speculum at the top end, so that she can hold it in place herself. This will also give her the feeling of having more control over the examination [Figure 33].
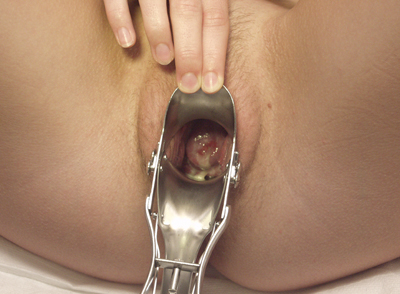 Figure 33
Now start the internal inspection:
Describe:
- Vaginal walls
The mucous membrane of the vaginal walls is normally shiny pink in colour. In women of child-bearing age folds run across the total length of the vagina, known as rugae vaginales. - Content of the vagina and fornices
There is always a small amount of transparent white discharge present. On the external cervical os there may be some clear cervical mucus visible. If mucus or discharge inhibits the inspection, you can remove it with a cotton bud or with a gauze swab held in a pair of swab forceps [Figures 34, 35].
Some discharge can be sampled for further investigations if pathology is suspected.
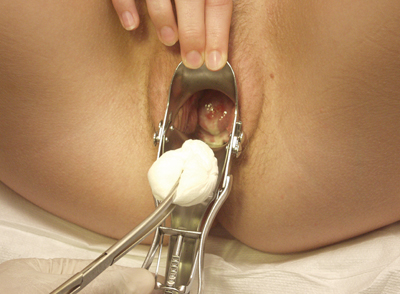 Figure 34
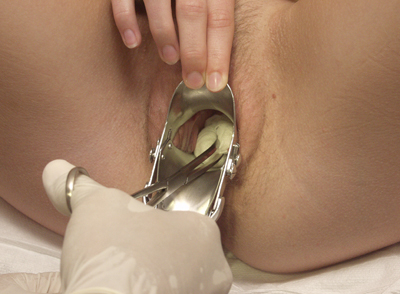 Figure 35
- Vaginal portion of the cervix, describe:
- Shape
- Size
- Position
- Surface
- Colour
- External os
- Cervical mucus
- Transition zone.
The cervix is a round ‘bulge’ of the uterus into the vagina. Depending on the position of the uterus, cervix can point towards the symphysis pubis (ventrally) or the sacrum (dorsally). Generally, the surface is smooth and, the colour is pink, but a bit lighter than that of the vaginal walls.
The os is a small and round ‘pinpoint’ in a woman who has never given birth (vaginally) before and it is slit-shaped after one or more deliveries. Cervical mucus is often visible in and on the external os.
Depending on the phase of the cycle this mucus can be clear or turbid, and varies in quantity. In a woman of child-bearing age the transition from stratified squamous epithelium to columnar epithelium (as found in the cervix) is often visible. The columnar epithelium is slightly darker red in colour [Figure 36].
If a woman has a coil inserted (IUD or IUS), you will be able to see the strings protruding from the os.
 Figure 36
Inspection of the vaginal wall and removing the speculum
Once you have finished the internal inspection and any diagnostic investigations you would like to carry out, remove the speculum as follows [Figures 37, 38, 39, 40]:
Unfix the speculum. Pay close attention to the blades to ensure their position does not suddenly change (hold the speculum firmly). Then, carefully open it a little more. If you can see that the cervix is ‘released’, carefully pull the speculum back whilst allowing the blades to move. Again, follow the direction of the vaginal axis during this manoeuvre, and rotate the speculum back into the 45 degrees position. If you carry out this movement properly, with the wrist upwards, the blades of the speculum will automatically be pushed together under pressure from the vaginal walls. You may (almost) not have to actively close the speculum yourself. Ensure that the urethra is not touched by the side of the speculum. The vaginal walls can be further inspected when retracting the speculum. The anterior and posterior wall in particular are now clearly visible when the speculum is rotated slightly. Do not completely close the speculum when removing it; the vaginal wall may become trapped between the blades and this is very painful.
 Figure 37
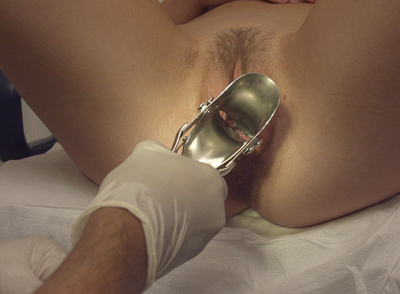 Figure 38
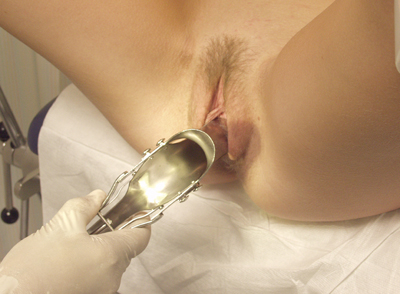 Figure 39
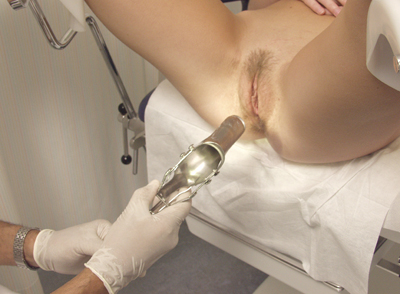 Figure 40
Occasionally the cervix can become stuck / trapped inside the speculum. This can be solved by sufficiently opening the speculum and carefully turning it a bit. If this does not help, you can hold the cervix back with a gauze swab held using swab forceps.